


Tags for die-cutting – maximize your crafting with Hilmaspyssel.se
Do you want to create stylish, personalized details for packages, cards, and scrapbook pages but get stuck at the very first step? Tags for die-cutting are one of the most affordable and versatile crafting accessories – and at Hilmaspyssel.se, you’ll find a wide range of die-cutting templates for tags, labels, and labels that will instantly elevate your DIY projects.
In this guide, we’ll cover everything you need to know: what die-cut tags are, what types of tag die-cutting templates are available, how to choose the right materials and tools, and concrete ideas for scrapbooking, cardmaking, and gift wrapping. You’ll get practical tips, design tricks, and a simple buying guide so you can confidently choose the right crafting supplies at Hilmaspyssel.se and start creating professional-looking tags today.
Tags for die-cutting are one of the most useful and accessible crafting accessories for those who enjoy scrapbooking, cardmaking, and DIY projects. With the help of tag die-cutting templates and a die-cutting machine, you can quickly create your own tags, labels, and labels in precisely the style and size you need – from simple gift tags to advanced layered decorations.
What is meant by tags for die-cutting?
When talking about "tags for die-cutting," it usually refers to:
-
Pre-made tags: Already die-cut labels, ready to decorate and use directly.
-
Tag die-cutting templates (dies): Metal templates that you run through a die-cutting machine to create your own tags again and again.
-
Digital templates: Printable or cut-file templates (e.g., for electronic cutting machines) for those who want to work digitally.
What makes die-cut tags so popular is their flexibility: you decide the paper, color, texture, and size. Unlike store-bought tags, you can perfectly match your tags with the rest of your project, such as a card, a mini-album, or gift wrap.
How does die-cutting work – materials and your first simple project
Die-cutting involves placing paper together with a metal die in a die-cutting machine, cranking or running it through, and getting a precisely cut shape. For tags, you typically use:
-
Cardstock (approx. 200–300 g) for sturdy, durable tags
-
Patterned paper for decorative backgrounds
-
Watercolor paper when you want to paint or do ink blending
-
Vellum for light, semi-transparent layers
-
Thin chipboard for extra sturdy tags, e.g., for keychains or albums
A perfect beginner project is to make personalized gift tags: choose a simple rectangular tag die-cutting template, die-cut it from white or kraft-colored cardstock, stamp a greeting, punch a hole, and tie a string. Even here, you'll notice how much more thoughtful and professional a wrapped gift can feel with a self-die-cut tag.
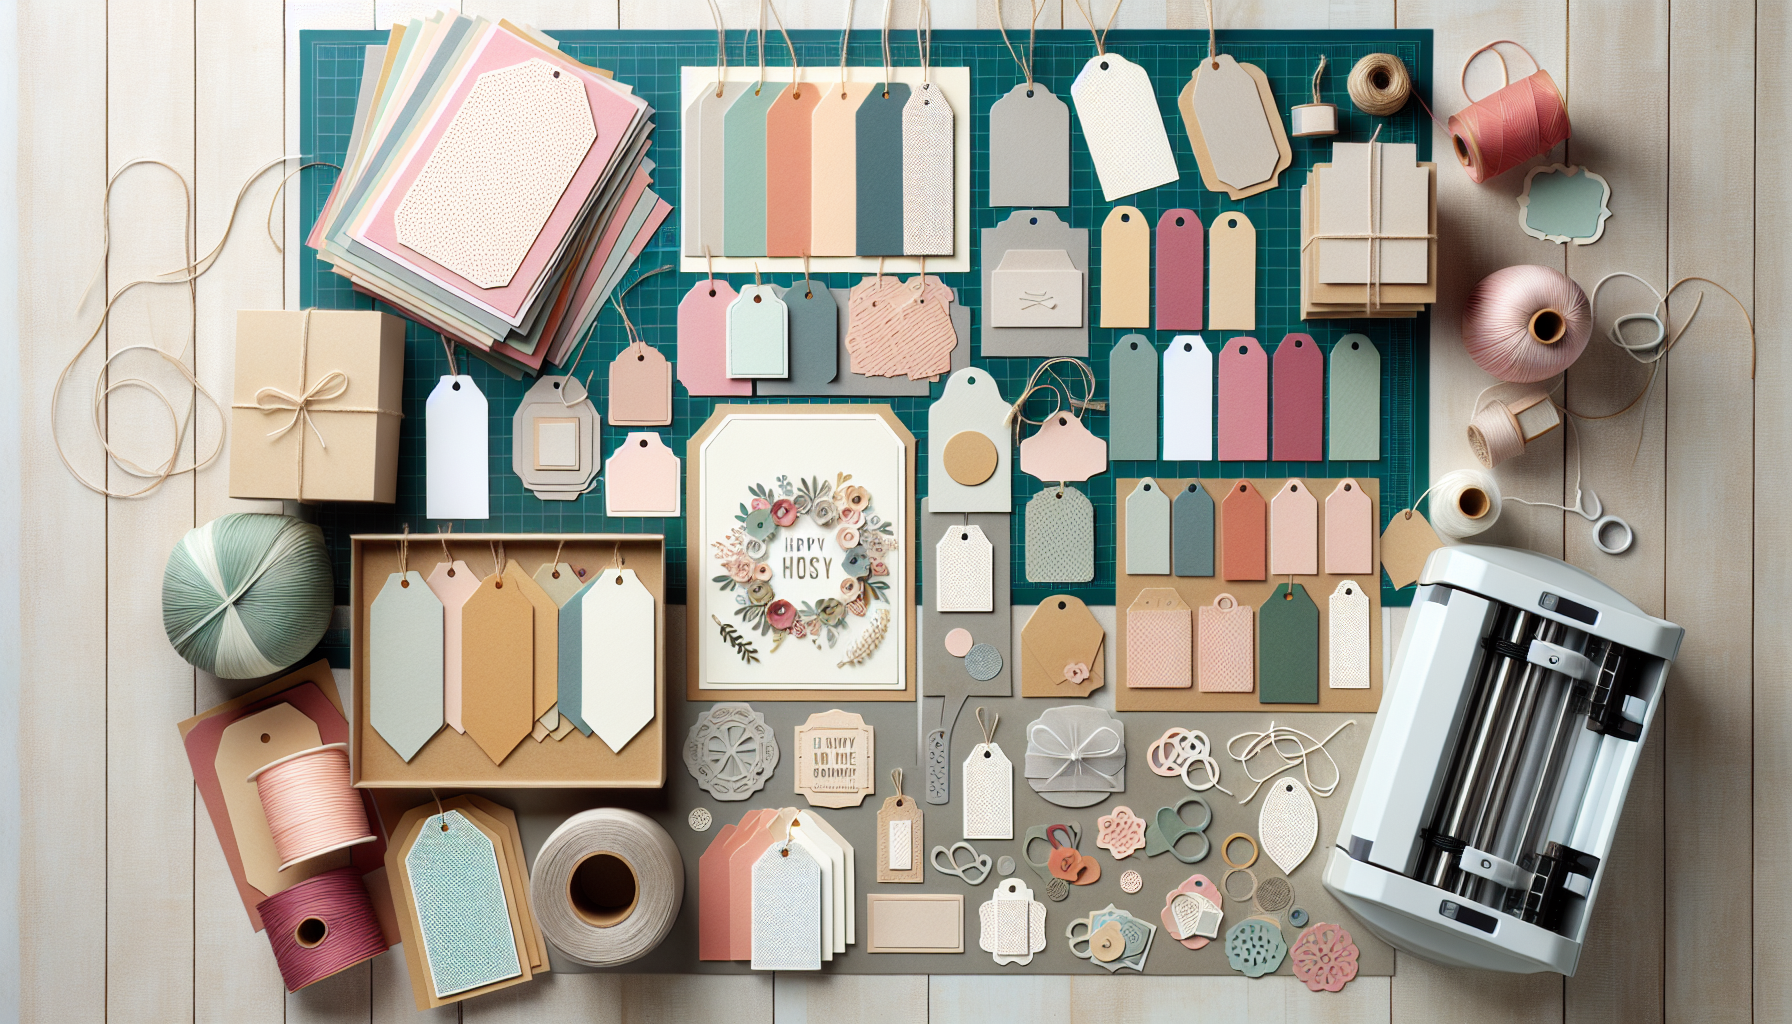
Different types of tags for die-cutting at Hilmaspyssel.se
As you begin to explore tags for die-cutting, you'll quickly discover how many different shapes and styles there are. At Hilmaspyssel.se, you'll find a wide selection of tag die-cutting templates, suitable for everything from simple gift tags to advanced scrapbooking layouts and cardmaking. By choosing the right tag shape, you can enhance the overall feel of your project – whether you're aiming for a sleek, playful, or romantic wedding theme.
Classic, decorative, and layer-friendly shapes
Here are some of the most common types of tag die-cutting templates you'll find at Hilmaspyssel.se:
-
Classic rectangular tags: Perfect as gift tags, bookmarks, or journaling tags in albums.
-
Tags with rounded corners or banners: Create a softer or more graphic look – popular for cards and planners.
-
Circular and oval tags: Excellent as focal points for a stamp, greeting, or a smaller photo.
-
Decorative edges (scallop, stitched, wavy): Give a more elaborate and "store-bought" feel without extra embellishments.<
-
Sets with multiple sizes: Make it easy to build layered effects and create depth in your design.
By combining a plain base tag with a smaller tag with a decorative edge, you quickly achieve a professional look, even as a beginner. Top-ranked content often mentions sets with multiple sizes as a "must-have" product, as they are so flexible.
Themed tags for seasons and special occasions
In addition to basic shapes, Hilmaspyssel.se often offers themed tag die-cutting templates – something many online guides fail to highlight properly. Here, for example, you can find:
-
Christmas and winter tags in the shape of a label, Christmas bauble, or tags with snowflake details.
-
Birthday and party tags suitable for invitations, goodie bags, and balloon decorations.
-
Baby and christening-inspired tags with soft shapes suitable for gifts and mini-albums.
-
Wedding tags for place cards, "thank you" gifts, and stylish banners.
A smart approach is to build a small base collection of neutral tag shapes and then supplement with an occasional special shape for seasons like Christmas or major holidays. This way, you get maximum use out of your various tag die-cutting templates, without breaking your crafting budget.
Materials, tools, and accessories for successful tag die-cutting
To get truly beautiful and durable tags for die-cutting, fine die-cutting templates are not enough – the right die-cutting machine, paper, and accessories make a huge difference. In this section, we'll go through what you actually need, what options are available, and how to avoid common beginner mistakes like frayed edges or buckled paper.
Die-cutting machines, dies, and base materials
-
Die-cutting machines: Choose a sturdy machine with even pressure, e.g., a classic crank-driven machine for thin dies. For those who die-cut a lot of chipboard, a stronger machine might be worth the investment.
-
Thin dies vs. thicker dies: Thin metal dies are perfect for paper, cardstock, and vellum. Thicker dies can handle thicker materials but often produce fewer, simpler shapes.
- Recommended paper types:
-
Cardstock 200–250 g – the standard choice for tags, sturdy yet easy to decorate
-
Watercolor paper – ideal if you want to paint or use distress ink
-
Patterned paper – perfect for quick tags where the background already "does the job"
-
Vellum or thin chipboard – for layers, windows, or extra stiffness
When you combine the right grammage with suitable dies, you get clean, crisp edges without cracks. A tip is to always do a test cut in a scrap piece before starting with your "good" paper, especially if you are trying new material.
Smart accessories and organization for smooth crafting
In addition to the machine and paper, there are several small heroes that make die-cutting both easier and more fun:
-
Embossing folders – add texture to your tags and make even simple shapes interesting
-
Hole punch and eyelet tools – reinforce the hole on the tag and give a more professional impression
-
Strings, twine, and ribbons – literally tie everything together and make the tag easy to attach to packages or in albums
-
Storage: Store die-cutting templates on magnetic sheets or in pockets, and pre-cut tags sorted by size or theme in small boxes or envelopes.
A simple checklist for those who want to start: 1) a reliable die-cutting machine, 2) a set of basic tags in different sizes, 3) white and kraft-colored cardstock, 4) hole punch/eyelets, and 5) a couple of neutral ribbons. With that foundation, you can create a multitude of varied tags with products from Hilmaspyssel.se without overfilling your craft box.
Creative uses for die-cut tags in crafting and scrapbooking
Die-cut tags are one of the most versatile crafting accessories you can have in your collection – and with the right tag die-cutting templates from Hilmaspyssel.se, you can use them in everything from gift wrapping to advanced scrapbooking layouts. Here, we'll go through concrete ways to use tags that many top articles mention, but with an extra focus on practical examples and smart shortcuts.
Tags in gifts, scrapbooking, and cardmaking
-
Presents and gifts: Use a simple rectangular tag as a gift tag. Die-cut it from sturdy cardstock, stamp a greeting, and tie it on with jute twine or satin ribbon. For Christmas gifts, you can use themed die-cutting templates with snowflakes or fir trees from Hilmaspyssel.se.
-
Scrapbooking: Create journaling tags where you write dates, locations, or small stories. Place them in pockets or behind photos so they can be pulled out like little secret messages. Oval or rounded tags work perfectly as photo mats in mini-albums.
-
Cardmaking: Let a larger tag become the card front itself – fold it at the top and you get a mini-card. You can also make shaker tags by combining two tags with windows (acetate) and 3D tape.
Here are three quick projects with die-cut tags:
-
5-minute gift tag: Solid-colored tag + "Congratulations" stamp + a little twine.
-
Layered scrapbooking tag: Two tags of different sizes, patterned paper behind, small label with date on top.
-
Interactive card tag: A pull-out tag hidden in a pocket on the card front with a hidden greeting.
Tags for parties, weddings, and everyday organization
Tags make it easy to create a cohesive style for weddings, christenings, graduations, or children's parties. Use the same tag die-cutting template for:
-
Place cards: Small tags with the guest's name, attached around the napkin or to the glass.
-
Buffet and dessert tables: Medium-sized tags on mini clothespins or sticks to label dishes.
-
Goodie bags: Die-cut tags from matching paper and stamp "Thank you for coming."
In everyday life, you can use die-cut tags for smart organization:
-
Home storage: Label boxes, baskets, and jars with laminated tags for extra durability.
-
School supplies and office: Attach small tags to binders, folders, and pen holders for a quick overview.
By choosing a couple of basic templates from Hilmaspyssel.se – for example, a classic rectangular tag and a circular one – you can cover almost all these uses. Just change the paper, colors, and decorations, and you'll get endless variety without having to buy new products every time. This is the key to both creative freedom and budget-smart crafting.
Design and layout tips – how to create beautiful tags for die-cutting
Once you have the right die-cutting templates and paper in place, the next step is to make your tags look thoughtful and professional. This is all about color choices, composition, and small details. Many guides mention individual tips, but rarely how to combine them into a simple formula that works every time – that's what we'll go through here.
Color, layers, and embellishments that elevate your tags
-
Color combinations that work:
– Monochromatic (different shades of the same color) gives a calm, stylish impression
– Contrasting colors (e.g., blue/yellow, pink/green) create energy and are suitable for children's parties and birthday tags
– Tone-on-tone with neutral accents (kraft, white, beige) is perfect for weddings and vintage projects
-
Build layers for more depth:
– Die-cut the same shape in two to three sizes and layer them on top of each other
– Use foam tape between layers for dimension without the tag becoming heavy
– Let the bottom layer be the simplest, and the top layer carry the motif and text
-
Decorate with balance:
– Stamped motifs or text as a focus
– Small embellishments like enamel dots, die cuts, or stickers in groups of 3 for a harmonious layout
– Ribbon, twine, or lace through the hole for a finished and "worked-through" feel
When combining color, layers, and embellishments, it's smart to start simple: choose a base color, an accent color, and a maximum of two types of embellishments. This way, you avoid cluttered tags and achieve a consistent look that matches the rest of your project.
A simple formula for an always-beautiful tag
A practical rule of thumb that works for most styles is this design formula:
-
Background: A die-cut tag in a neutral or subdued color (e.g., kraft, white, soft pastel). Preferably with a light pattern or subtle ink blending along the edges.
-
Focal motif: A clear element – stamped motif, die cut, small image or symbol (heart, star, flower) placed slightly above the center or slightly to the side for more dynamism.
-
Text: A short, clear greeting or label (e.g., "Congratulations," "Thank You," "For You," or date) in a readable font. Stamped, embossed, or printed and die-cut into a smaller banner.
-
Small detail: An extra touch that ties everything together – e.g., a ribbon in the accent color, a gold splatter, a small die-cut leaf sprig, or three enamel dots in the corner.
Test the formula with different color palettes and styles: from clean & simple to romantic shabby chic. Once you master the basics, it's quick to adapt your tags to any theme – and your die-cut tags from Hilmaspyssel.se will always look thoughtful and harmonious.
Step-by-step guide: From idea to finished tag with products from Hilmaspyssel.se
One of the most common questions among crafters is: "How do I go from a vague idea to a truly elaborate tag without getting stuck along the way?". In this guide, we use tags for die-cutting and other crafting accessories from Hilmaspyssel.se to show a clear, reproducible process – from the first thought to a finished, mounted tag on a package, card, or layout.
From theme to pre-cut base
Always start with a clear purpose. Ask yourself: Who is the tag for and what should it say?
-
Choose a theme: e.g., birthday, Christmas, thank you, baby, wedding, or "just because."
-
Choose a tag die-cutting template: classic, wavy, stitched, or banner – adapt the shape to the feel and recipient.
-
Choose paper from Hilmaspyssel.se: solid cardstock for the base, optionally supplement with patterned paper for layers.
-
Die-cut the tag: run it through the die-cutting machine with the correct "sandwich." It's a good idea to tape the die in place with washi tape to prevent it from slipping.
Once the base is die-cut, you have a clean, professional shape to build upon. This is where more experienced crafters often differ from beginners – they take the time to choose the right combination of die + paper from the start, which makes the rest of the process easier.
Decorate, assemble, and adapt difficulty level
Now it's all about the details. Think in three levels: background, focal motif, and text.
-
Background: add light ink blending, splatter with watercolor paint, or an embossed texture for more depth.
-
Focal motif: use stamped motifs, die cuts, or stickers from Hilmaspyssel.se. Feel free to build layers with foam tape for dimension.
-
Text: stamp a greeting, write by hand, or print out a small label. Place near the focal motif for a cohesive look.
-
Mount the tag: attach it with string to a package, with double-sided tape to a card front, or with photo corners in a scrapbooking layout.
For a beginner tag, a base + simple stamped text + ribbon is enough. A more advanced tag can include multiple layers of tags in different sizes, faux stitching (stitched dies), vellum layers, and matching enamel dots – all available as product categories at Hilmaspyssel.se. This way, you can easily scale up or down the complexity without losing the common thread in the design.
How to choose the right tags for die-cutting at Hilmaspyssel.se
Choosing the right tags for die-cutting can feel overwhelming when there are so many die-cutting templates, formats, and styles. In this section, we'll help you make smart, well-thought-out choices based on your specific projects – whether you're crafting for everyday, weddings, or Christmas. Based on the assortment at Hilmaspyssel.se, we'll go through what's really worth spending money on and what's enough as a basic kit for most crafters.
What will you use the tags for? – needs, style, and use
First, consider how your tags will primarily be used:
-
For gift wrapping and cards: Invest in classic rectangular tags in several sizes and some round/oval shapes. They are timeless and work year-round.
-
For scrapbooking and memories: Choose sets with many sizes and preferably stitched edges for a more "finished" look in albums and layouts.
-
For weddings, christenings, and parties: Here, more decorative scallop or wavy edges and sets that match other dies you have, e.g., hearts or frames, pay off.
-
For organization and labeling: Simple, clean shapes in medium size work best – easy to read, easy to multiply, and perfect for laminating if needed.
Also try to match the style of the tags with the rest of your collection: do you have a lot of clean & simple stamps, or do you lean more towards vintage and shabby chic? Choose die-cutting templates that enhance your existing style, not clash with it.
Buying guide: smart initial choices and when you can splurge
To make it extra easy to get started at Hilmaspyssel.se, you can use this simple buying guide:
-
Basic Die #1: Set of classic rectangular tags in several sizes – your most useful investment.
-
Basic Die #2: Circles or oval tags with holes – perfect as quick labels, Christmas hangers, and layered behind text boxes.
-
Complementary Set: A decorative set with scallop or stitched edges for when you want to elevate the design without extra hassle.
-
Special Tags: Theme-based dies (Christmas, wedding, baby) – buy these when you know you'll be doing several projects within the same theme, e.g., the entire wedding series with invitations, place cards, and thank you cards.
Use the product images and close-ups on Hilmaspyssel.se to assess proportions and details. A tip is to compare the measurements in the product description with a standard card (10.5 x 14.8 cm) or an A4 page so you can see how large the tags actually turn out. This way, you reduce mispurchases and gradually build up a well-thought-out collection of tag dies that you will use again and again.
Frequently Asked Questions about Tags for Die-cutting
Q: Do I need an expensive die-cutting machine to use tags for die-cutting?
A: No, you don't need the most expensive machine to get started. Most tag dies at Hilmaspyssel.se work in common manual machines like Big Shot or similar models. The most important thing is that the machine can handle thin dies and that you have the correct plates. If you are a complete beginner, you can start with a simpler, smaller machine and expand your equipment as you go when you know you like the technique.
Q: Which paper weight and paper are best suited for die-cut tags?
A: For durable and attractive tags, cardstock between approximately 200–250 g is recommended. For more exclusive projects (weddings, memory albums), you can go up to 300 g. If you want a softer expression, watercolor paper and textured paper are perfect, while vellum provides light, translucent layers. For organizing labels, you can laminate thinner paper or use thin chipboard for extra stability.
Q: How do I prevent my tags from having frayed or uneven edges when die-cutting?
A: Frayed edges are usually due to dull plates, material that is too thick, or an incorrect "sandwich". Try this:
-
Place a thin piece of copier paper on top of the paper for a cleaner cut
-
Crank back and forth twice through the machine for thicker paper
-
Clean the die of paper residue regularly
-
Rotate your plates so they wear more evenly and cut better for longer
Q: What is the difference between basic tags and more advanced, decorative tags?
A: Basic tags are simpler shapes (rectangles, circles, pennants) without much decorative detail. They are perfect as "workhorses" you use in almost every project. Decorative tags have scallop edges, stitching details, punched-out hole patterns, or thematic shapes (hearts, Christmas ornaments, label shapes). They elevate the design but are often more niche. A smart approach is to start with 1–2 basic sets in several sizes and then complement with a favorite in a decorative style.
Q: Can I use the same die-cut tags for both scrapbooking and home organization?
A: Absolutely. That's one of the reasons why tags for die-cutting are so cost-effective. In scrapbooking, you can use them as journaling tags, photo mats, and layers. In the home, you can die-cut the same shape in sturdy cardstock, laminate it, and use it as labels on boxes, toys, binders, or in the kitchen. Just change the style of paper, colors, and fonts to adapt the tag to its purpose.
Q: How do I choose the right first tag dies if I'm shopping at Hilmaspyssel.se?
A: Think about three things: what you do most (cards, gifts, albums), what style you like (clean & simple, romantic, playful), and what sizes you actually use. A good beginner's kit is:
-
A set of rectangular tags in several sizes
-
A round or oval tag set for variety
-
A decorative model, e.g., stitched or scallop, for "that little something extra"
Start with these, test them in different projects, and then complement with more specific Christmas, baby, or wedding tags as needed.
Conclusion: Make tags for die-cutting your creative superpower
Tags for die-cutting are more than small pieces of paper – they are flexible design building blocks that can elevate everything from gift wrapping and card making to scrapbooking and home organization. Throughout the article, you've gained a comprehensive understanding: what tags are, what types are available, what materials and tools work best, and how to design and build both simple and advanced tag projects with a clear, simple formula. You've also received a practical step-by-step guide and purchasing support for choosing the right dies at Hilmaspyssel.se.
Now the next step is to put inspiration into action. Start with a small project – for example, a set of personalized gift tags – and experiment with different shapes, layers, and decorations. Explore the range of tag dies and matching craft supplies at Hilmaspyssel.se, build a small basic set, and add special tags as you find your style. The more you play and experiment, the faster you'll find your favorite combinations – and your tags will feel thoughtful, personal, and professional in every project.