


Letter Punch Sets from Hilmaspyssel.se – Guide, Tips, and Inspiration
Do you want to make personalized jewelry, keychains, or name tags that look professional – without expensive specialized equipment? With letter punch sets, you can easily create unique texts, dates, and names in metal, leather, and other materials. At Hilmaspyssel.se, you'll find thoughtfully designed sets of letter punches, number punches, and symbols suitable for both beginners and more experienced crafters.
In this guide, we'll cover everything you need to know to succeed: which punches to choose, which materials work best, exactly how to do it step-by-step – plus plenty of concrete project ideas. You'll also get tips on smart accessories, common beginner mistakes to avoid, and how to care for your tools so they last longer. Perfect if you want to get started right away with the right products from Hilmaspyssel.se.
Letter punches are small, sturdy metal tools where each punch has a letter engraved on one end. When you place the punch against a metal blank, piece of leather, or other surface and strike it with a hammer, a clear, permanent letter is created in the material. This allows you to create personalized text – such as names, dates, or short messages – directly in your jewelry or craft project.
Letter Punches, Number Punches, and Symbol Punches – What's the Difference?
To understand the range at Hilmaspyssel.se, it's important to distinguish between different types of punches:
-
Letter Punches: A–Z (sometimes also Å, Ä, Ö in separate sets), used for names, words, quotes, and initials.
-
Number Punches: 0–9, perfect for dates, coordinates, years, and personal number combinations.
-
Symbol Punches: Hearts, stars, paw prints, infinity symbols, etc., that complement the text and add extra character.
By combining letters, numbers, and symbols, you can create everything from simple name necklaces to elaborate messages on bracelets, keychains, dog tags, and small signs. Many beginners underestimate how much variation you can achieve with just a basic set of letters and a simple set of numbers.
Manual vs. Machine Punches – Which Level Suits You?
For hobby use and home crafting, manual letter punches are almost always used: you place the punch yourself and strike it with a hammer. They are affordable, flexible, and perfect for personalized jewelry on a small scale. For more advanced needs, such as larger production or very hard metals, machine solutions (e.g., presses) can provide more consistent results – but they are rarely needed for typical DIY projects.
As a beginner, a manual punch set, a stable work surface, and simple blanks will get you far. The rest of this guide will help you choose the right punches, materials, and techniques so you can quickly achieve professional results, even if you've never held a letter punch before.
Different Types of Letter Punches at Hilmaspyssel.se
Hilmaspyssel.se has built up a range of letter punches that caters to the needs of both beginners and experienced jewelry makers. To achieve a beautiful, legible, and personalized result, it's important to understand the difference between various fonts, sizes, and quality levels – something many simpler guides omit. Here, we'll go through the most common variations and how to choose the right set for your projects.
Fonts and Sizes – How Expression is Affected
At Hilmaspyssel.se, you'll find, among other things:
-
Classic block letters (uppercase): Clear, easy to read, and perfect for name tags, dog tags, and keychains.
-
Lowercase letters: Give a softer, more modern expression – nice for subtle jewelry and short quotes.
-
Script/handwriting styles: Create a more personal, handmade feel – often used for wedding and memorial jewelry.
-
Various sizes, e.g., 1.5 mm, 3 mm, 6 mm: Smaller sizes are suitable for thin rings and small charms, larger sizes are ideal for blanks and signs.
A practical rule of thumb is to choose 1.5–3 mm for subtle jewelry and 4–6 mm for anything that needs to be visible from a distance, such as bag tags or ID tags. By combining uppercase and lowercase letters, you can also create more dynamic texts, e.g., names in lowercase with an uppercase initial.
Budget, Premium, and the Right Set for Your Level
When choosing letter punches from Hilmaspyssel.se, you can think like this:
-
Budget-friendly sets: Good for those who want to try metal stamping, do occasional projects, or craft with children/teenagers.
-
Premium punches: Harder steel, more consistent impression, and longer lifespan – perfect if you sell jewelry or stamp frequently.
-
Sets for beginners: Often in standard fonts (block letters 3 mm) that work for almost all types of projects.
-
Sets for experienced crafters: Specialty fonts, multiple sizes, and complementary number and symbol punches for more advanced designs.
A smart approach is to start with a neutral all-round set of 3 mm uppercase letters and then supplement with a smaller set for rings or a more decorative script font. This way, you gradually build up a tool collection that is both affordable and flexible, instead of buying everything at once without a clear plan. Hilmaspyssel.se makes it easy with clear product descriptions and recommendations linked to different levels and projects.
What Material Can You Stamp? – Metals and Other Surfaces
The choice of material is crucial for both the appearance and durability of your jewelry and tags. Many beginners start with the "wrong" metal, which makes stamping unnecessarily difficult. By understanding the difference between aluminum, brass, copper, stainless steel, and leather, you can quickly achieve professional results with your letter punches from Hilmaspyssel.se.
Common Metals for Letter Stamping
-
Aluminum: Very soft, easy to stamp, and perfect for beginners. Ideal for name necklaces, simpler keychains, and larger blanks where you want clear, deep impressions.
-
Brass: Slightly harder, with a warm golden tone. Works well for coordinate bracelets, personalized charms, and more exclusive gifts.
-
Copper: Softer than brass but heavier than aluminum, gives a warm, reddish tone. Excellent for statement blanks and personalized quotes.
-
Stainless steel: Very hard and durable. Best for dog tags, ID tags, and everyday jewelry that needs to withstand tough use, but requires the right type of punches and a stronger hammer.
For each metal, Hilmaspyssel.se typically indicates the recommended hardness and which punches can handle the material, something often missing in simpler online guides. A practical tip is to always test-stamp on a scrap piece first to find the right striking force.
Leather, Faux Leather, and Safe Stamping
Metal isn't the only thing you can stamp. Leather and faux leather are popular alternatives for bracelets, key fobs, and bag tags. Here, you usually use slightly milder strikes and preferably a softer backing pad to avoid marks around the letters.
To prevent premature wear on your letter punches, it's important to:
-
Avoid stamping in excessively hard metals with hobby-grade punches (always follow the store's recommendations).
-
Use the correct hammer – too weak strikes on hard material will only make you strike more times and increase the risk of double impressions.
-
Keep punches clean from metal shavings and dust, especially after working with steel.
By matching the right material with the right punches and technique, you'll achieve both better results and a longer lifespan for your tools – and here, the product descriptions and guides at Hilmaspyssel.se are a shortcut to safe, durable choices.
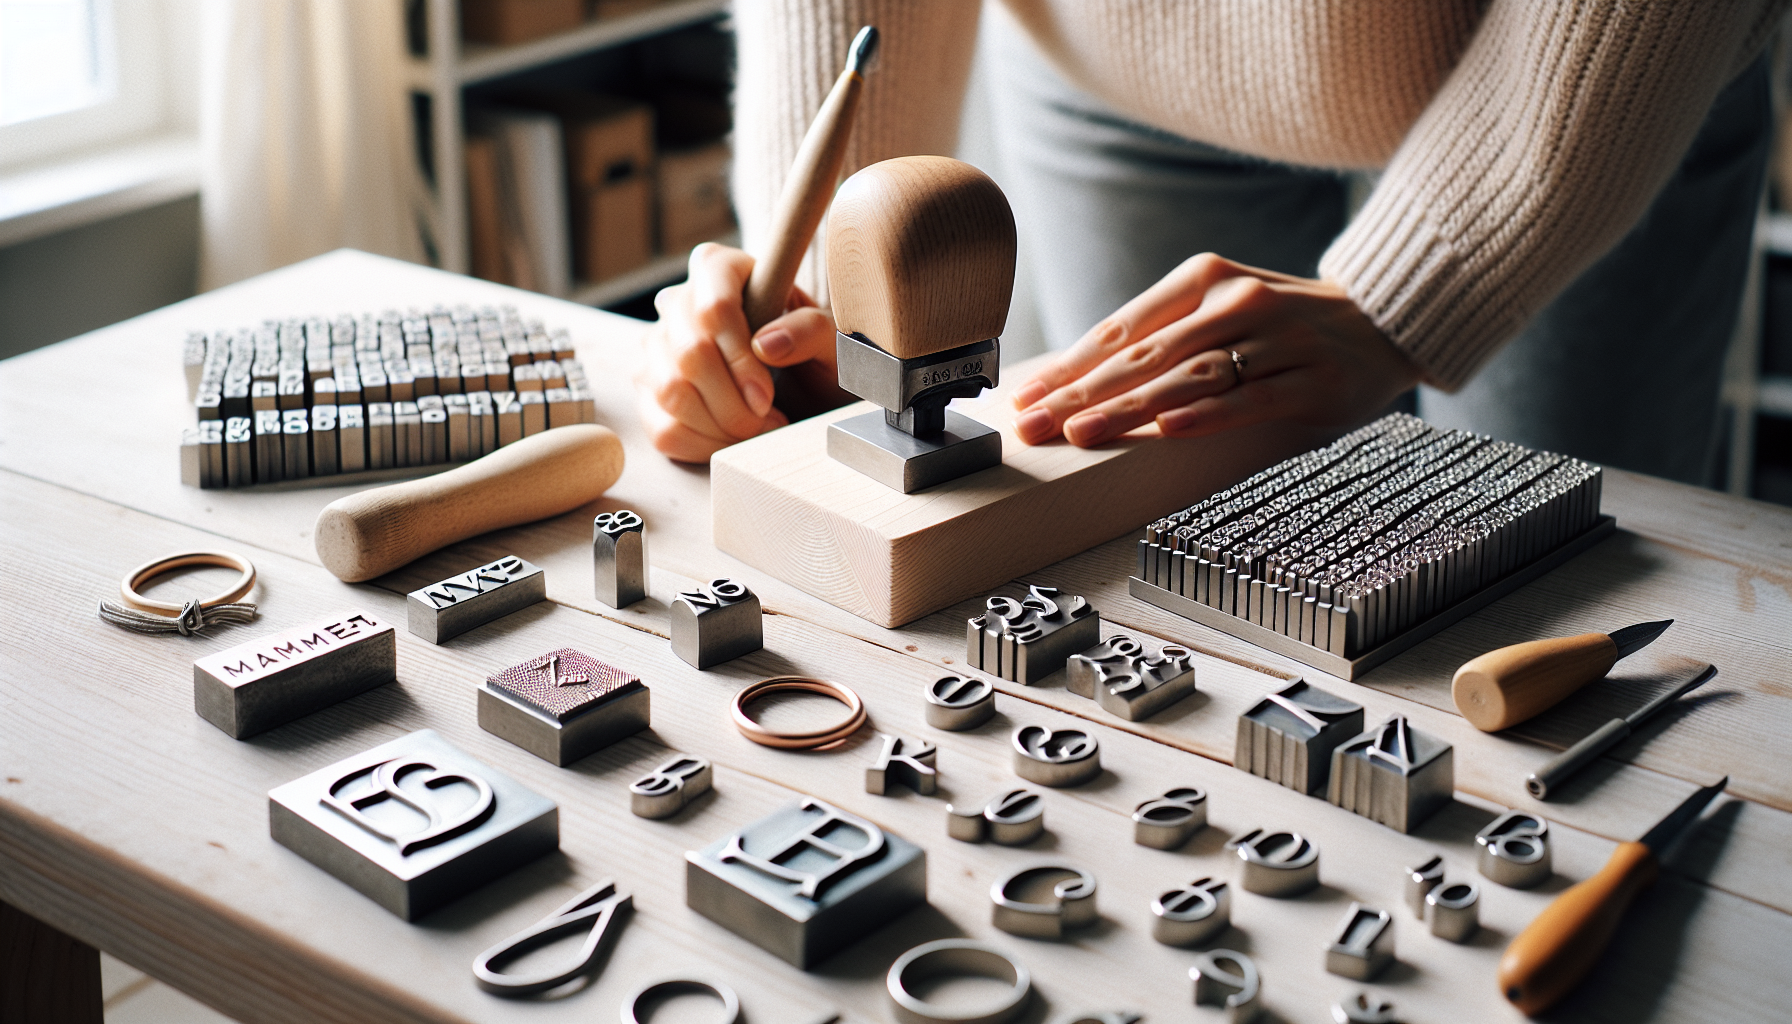
How to Get Started – Step-by-Step Guide for Using Letter Punches
Starting to stamp your own jewelry and blanks can feel a little nerve-wracking the first time, but with the right preparation, the results will quickly be both even and professional. In this section, we'll go through a practical step-by-step guide, based on proven techniques and things often missing in simpler beginner guides – so you can avoid unnecessary mistakes and wasting material.
Prepare Your Workspace and Tools
A stable foundation is crucial for sharp impressions:
-
Workspace: Choose a sturdy table that doesn't spring. Place a steel stamping block or a strong stamping plate on top – this concentrates the striking force and protects the table.
-
Correct hammer: For metal, a ball peen hammer or striking hammer weighing 250–500 g is ideal. For leather, a nylon or rubber mallet might be better to protect the material.
-
Guides and marking: Use masking tape as a straight line and a thin permanent marker or marking pens to mark the center and letter placement.
-
Secure grip: Preferably use a punch holder or hold the punch with a stable, but relaxed grip to prevent it from slipping during the strike.
When the workspace is properly set up, you reduce vibrations, double impressions, and crooked letters – issues many beginners experience as "mysterious" errors despite striking hard enough.
Step-by-Step: From First Strike to Finished Jewelry
Here's how the actual stamping is done, step-by-step:
-
1. Plan the text: Write down the word/phrase first. Count the letters and lightly mark on the metal or leather where the text should begin and end, preferably with small dots.
-
2. Position and aim the punch: Make sure the letter is facing you correctly, hold the punch vertically (90° to the surface), and place the tip exactly where you've marked.
-
3. The strike itself: Hold the punch still and strike a firm, controlled blow. For soft metals, one strike is often enough; for harder materials, you might need two – but without moving the punch between strikes to avoid shadow outlines.
-
4. Fill the letters: Fill the impression with permanent marker, paint pen, or color paste, let it dry slightly, then wipe the surface with a cloth/nail polish remover so that the color only remains in the grooves.
-
5. Clean and polish: Finish with light polishing (polishing cloth or polishing block) to enhance the shine without removing the stamping.
A good tip is to always test stamp on a scrap piece of the same material before working on your actual jewelry. This way, you'll find the right striking force and can adjust before it "really counts."
Common Beginner Mistakes – And How to Avoid Them
Most people encounter similar problems at first:
-
Crooked letters: Often due to the punch leaning. Practice especially holding it completely vertical. Use tape both as a line and a "stop edge" for the bottom of the letters.
-
Uneven depth: Comes from varying striking force or too soft a backing. Make sure to always strike on top of the stamping block and try to maintain the same force in each strike.
-
Double outlines: Occur when the punch moves between strikes. Aim for one clear strike instead of several small ones. If you have to strike twice – hold the punch firmly against the metal without the slightest movement.
By being meticulous with the basic technique now, you'll develop a working method that gives you beautiful, consistent results – and ensures that your letter punches from Hilmaspyssel.se stay sharp and nice for a long time.
Creative Project Ideas with Letter Punches from Hilmaspyssel.se
Letter punches become most inspiring when you see how many different projects they can actually be used for. Here, we collect concrete ideas – from personalized jewelry to clever everyday details – and link them to products you'll find at Hilmaspyssel.se so you can easily get started right away.
Personalized Gifts That Truly Mean Something
-
Name jewelry for christenings, confirmations, and graduations: Stamp names and dates on round or heart-shaped blanks in aluminum or brass. Combine with small charms (e.g., heart, cross, star) and a thin chain.
-
Couple's jewelry with dates or coordinates: Use narrower rectangular tags and stamp in the coordinates of where you met, got engaged, or got married. Uppercase letters in 2–3 mm often work best for clarity.
-
Mother's and Father's Day gifts: Create bracelets or keychains with children's names, initials, or a short message like "world's best mom/dad." Choose a clear, classic font for good readability.
Here, you can advantageously combine letter punches, ready-made jewelry components, and chains from Hilmaspyssel.se into complete gifts that look professional yet feel completely unique.
Everyday Items, Quotes, and Seasonal Projects
-
Keychains with quotes or affirmations: Stamp short words like "COURAGE," "HOPE," "BALANCE," or favorite quotes on thicker blanks. Perfect for self-encouragement – or as a friendship gift.
-
Metal bookmarks: Use longer metal strips and stamp book quotes, bible verses, or personal greetings. Finish with a tassel or a ribbon through a small hole at one end.
-
ID tags for bags and pets: Stamp names and phone numbers on round or bone-shaped tags in stainless steel or aluminum. Combine with robust key rings and carabiners.
-
Weddings and parties: Make personalized bridesmaid bracelets, "best man" keychains, small "thank you" tags for gifts, or place setting blanks with guest names – perfect for weddings, graduations, and Christmas dinners.
By starting with ready-made blanks, chains, and rings from Hilmaspyssel.se, you avoid having to search for parts in multiple places and can instead focus all your energy on the creative aspect – choosing the text, font, and layout that reflects your personal style.
Accessories and Tools That Make Stamping Easier
The right accessories make an enormous difference to how even, deep, and professional your stamped jewelry and blanks turn out. Many beginners focus only on the letter punches themselves, but top-ranked guides clearly highlight bases, hammers, and alignment aids as crucial. At Hilmaspyssel.se, you'll find thoughtfully designed accessories specifically for metal stamping and small-scale creative projects.
Basic Equipment for Safe and Beautiful Stamping
-
Stamping plate/steel block: Provides a hard, stable base so that the strike is maximally transferred to the metal instead of the table. Reduces vibrations and crooked impressions.
-
Striking hammer for metal stamping: A slightly heavier hammer (often around 300–500 g) gives cleaner impressions with fewer strikes. A ball peen hammer is common for metal, while a nylon mallet is good for shaping without marks.
-
Tape guides and rulers: Help you keep the text straight and evenly spaced – especially important for name jewelry and coordinates.
-
Blanks (pre-cut blanks and tags): Pre-stamped shapes in aluminum, brass, copper, or stainless steel that are ready to stamp directly, perfect for both beginners and professionals.
-
Storage for punch sets: Boxes, holders, or original boxes that keep the letters organized and protected from moisture and impact.
By investing in this basic equipment, you reduce the number of failed attempts, save material, and quickly achieve the "wow, this looks store-bought" feeling – even though you've done it all yourself at the kitchen table.
Recommended Starter Kit from Hilmaspyssel.se
For those who want to get started without missing anything important, a well-thought-out "starter kit" is invaluable. A smart first setup could, for example, consist of: a beginner-friendly set of letter punches in a classic font, matching number punches, a stable steel plate, the right striking hammer, tape guides, and a selection of round and rectangular aluminum blanks. With this combination, you can immediately create name necklaces, keychains, small signs, and personalized gifts – without needing to supplement with more basic tools right away. At Hilmaspyssel.se, you can use these components as a starting point to build your own kit based on style, budget, and the projects you dream of doing first.
Care, Maintenance, and Long-Term Durability for Your Letter Punches
For your letter punches to produce sharp, legible impressions year after year, it's not enough to just choose the right set – you also need to take care of them properly. Many guides briefly mention cleaning but miss the details that actually determine whether the punches last for months or many years. Here, we'll go through practical care, smart storage, and when it's time to supplement with new sets, with concrete tips based on the range at Hilmaspyssel.se.
Cleaning and Proper Handling After Each Crafting Session
-
Wipe the punches after use: Use a soft cloth to remove metal shavings, dust, and any color. If necessary, you can use a lightly damp cloth, but make sure the punches are dried completely immediately afterward.
-
Protect against rust and discoloration: For carbon steel punches, a thin film of acid-free oil on the punch head and sides can provide extra protection, especially if you store them in basements or other humid environments.
-
Avoid wrong materials and wrong hammers: Do not strike into excessively hard metals if the punch is not designed for it (e.g., stainless steel), and always use a hammer that is suitable for metal stamping according to the recommendations at Hilmaspyssel.se.
By making cleaning a routine – for example, before putting the punches back in their box – you reduce the risk of wear on both the tip and the shaft. This results in more consistent stamping depth and reduces the number of "failed" blanks and jewelry.
Storage, Common Mistakes, and When to Upgrade
Another key to durability is how you store your punches between projects:
-
Store dry, clean, and organized: Always return your stamps to their compartments or holders, preferably labeled by letter, number, or size. This saves time on your next project and reduces the risk of accidentally using the wrong stamp.
-
Avoid loose piles in toolboxes: When stamps hit each other, the edges can get damaged and the font becomes less sharp. Utilize original packaging or supplement with storage boxes from Hilmaspyssel.se.
-
Monitor wear and tear and the need for replenishment: If you notice that certain letters are used much more (e.g., A, E, S), it might be time to supplement with an extra set or upgrade in quality, for example, to a more premium set if you sell your jewelry.
By combining proper care, thoughtful storage, and a plan for when to upgrade, you build a sustainable tool inventory. This makes letter stamping not only more enjoyable but also more economical in the long run – and you know that you can always replenish with quality stamps and spare sets at Hilmaspyssel.se.
Frequently asked questions about letter stamps
Q: Which letter stamps should I choose as a beginner?
A: As a beginner, it's smart to start with an all-around set in a clear, straight font (e.g., classic sans serif) in size 2–3 mm. Feel free to combine letter stamps with number stamps in the same style, so your projects will be consistent. Choose stamps designed for softer metals like aluminum and brass – that way you get nice impressions without having to apply excessive force. At Hilmaspyssel.se, you'll find several sets clearly marked as beginner-friendly, often in practical packaging where the letters are easy to overview.
Q: Can I use the same stamps for all metals and materials?
A: Technically, many stamps can be used on multiple materials, but for best results, you should adapt both stamps and technique to the material. Soft metals (aluminum, copper, brass) are perfect for most hobby sets. Stainless steel is significantly harder and requires stamps marked for "stainless" as well as a heavy-duty hammer. For leather, metal stamps work, but you often get better precision with tools and surfaces adapted for leather. Always read the product description on Hilmaspyssel.se before combining a stamp and material.
Q: How do I avoid crooked and uneven letters when stamping?
A: The secret lies in preparation and support:
-
Use tape guides or a ruler that you attach to the blank to get a straight baseline
-
Lightly mark where each letter should sit before stamping
-
Hold the stamp vertically and steadily with your whole hand, not just your fingertips
-
A firm strike with the right weight is better than several weak strikes (reduces the risk of double impressions)
Practice on a scrap piece of the same material first, and you'll quickly find the right force and technique.
Q: How do I care for my letter stamps so they last a long time?
A: Clean the stamps lightly after use, wipe away metal shavings and paint residue with a dry or slightly damp cloth. Store them dry and organized, preferably in their original box or in a box where each stamp has its place – this way you'll quickly find the right letter and avoid unnecessary wear and tear. Avoid stamping in materials that are too hard if the stamps are not made for it, and always use a suitable hammer and steel block. Hilmaspyssel.se offers sets with practical storage that facilitates long-term care.
Q: What equipment do I need at a minimum to get started?
A: For a simple but functional starter kit, you need:
-
Letter stamps (preferably 2–3 mm, classic font)
-
Stamping pad or steel block as a stable base
-
Stamping hammer adapted for metal stamping
-
Blanks – pre-made tags or charms in e.g., aluminum
- Optional: tape guides and marking pen for extra precision
A smart way is to choose a ready-made starter kit from Hilmaspyssel.se where everything is put together to match.
Q: How do I make the letters more visible on my jewelry?
A: To enhance the impressions, you can fill them with color. The most common method among hobbyists and jewelry makers is to use a permanent marker or color wax/paste. Fill the indentations generously, let it dry for a short while, and then wipe the surface with a cloth and a little alcohol/acetone-free cleaner – the color will remain in the grooves. Finish with a quick polish to make the metal shine and maximize the contrast.
Create personalized masterpieces with the right letter stamps
Now you have received a complete overview of what letter stamps are, what types exist, what materials you can stamp on, how to proceed step by step, creative project ideas, necessary accessories, and how to care for your tools for maximum lifespan. Together, this provides you with a solid foundation for creating personalized jewelry, keychains, tags, and gifts that are emotionally and qualitatively lasting. By choosing the right font, size, and material, you can adapt each project to the recipient, occasion, and your own style.
The next step is to put inspiration into practice. Start with a small, manageable project – for example, a name necklace in aluminum or a keychain with a short message – and then build on it as your technique and tool collection grow. At Hilmaspyssel.se, you'll find letter stamps, starter kits, blanks, hammers, stamping blocks, and guides all in one place, carefully selected for both beginners and experienced crafters. Visit Hilmaspyssel.se, choose your first set, and let your next favorite gift be something you created yourself – letter by letter.