


Image Jewelry from Hilmaspyssel.se – How to Make Personalized Jewelry Step-by-Step
Do you want to make your own jewelry that feels truly personal – without needing advanced jewelry-making skills? Then image jewelry is perfect for you. With simple materials from Hilmaspyssel.se, you can transform favorite photos, quotes, and beautiful illustrations into unique necklaces, bracelets, earrings, and keychains that stand out.
In this guide, we'll cover everything you need to succeed: what materials to choose, how to find the right motif, clear step-by-step instructions, and clever professional tips that reduce the risk of bubbles, crooked images, and lost glass. You'll also get plenty of ideas for gifts, collections, and even how to start selling your own image jewelry – always with Hilmaspyssel.se as a reliable source of materials.
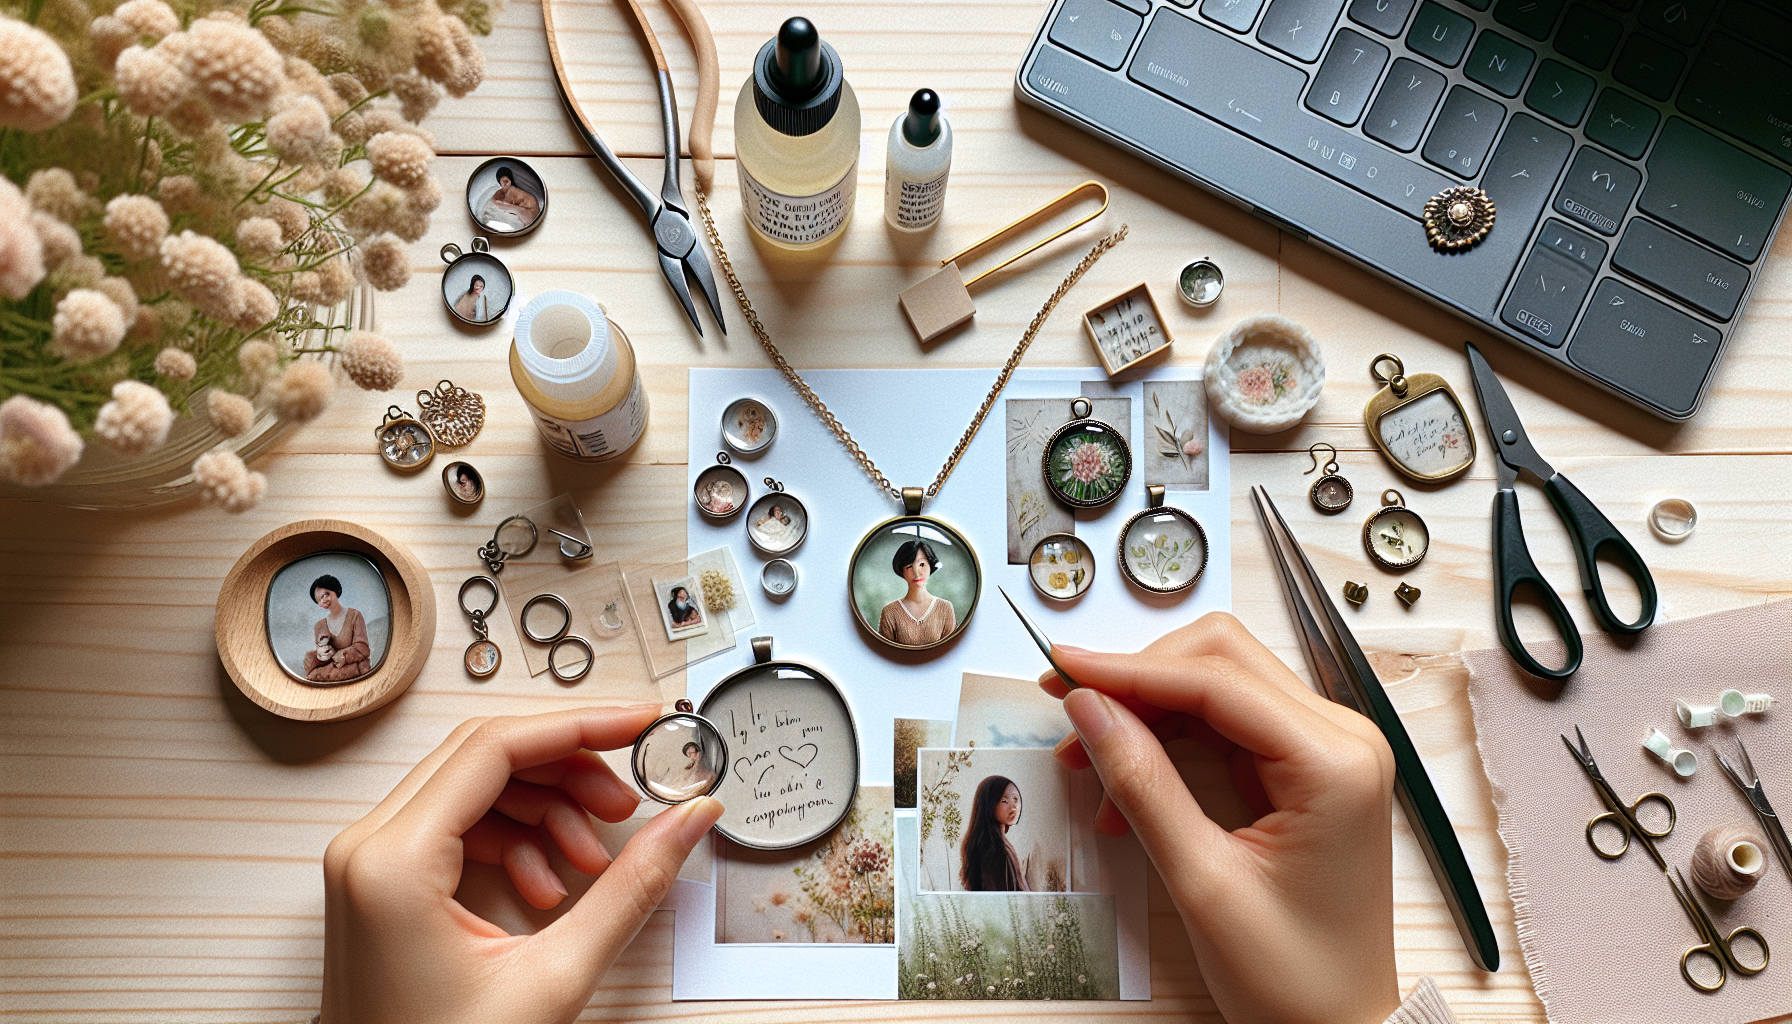
Image jewelry refers to personalized jewelry where an image, illustration, text, or pattern is enclosed under a clear dome of glass or resin, often mounted in a beautiful jewelry base. The result is a small "miniature painting" you can wear around your neck, on your wrist, in your ears, or on your keychain. The combination of simple technique and great possibilities for self-expression makes image jewelry a favorite among anyone who wants to make their own jewelry at home.
What is considered image jewelry?
Image jewelry can take many forms, but fundamentally has the same structure:
-
Necklaces: classic pendants with round or oval glass cabochons – perfect for photos of family or pets
-
Bracelets: link bracelets with several small pendants where you can create a series of motifs, e.g., different flowers or letters
-
Earrings: light, small cabochons with text, glitter, or miniature illustrations
-
Keychains and bookmarks: durable jewelry bases where the image jewelry can accompany you in everyday life
-
Brooches and pins: lovely to attach to a coat, bag, or hat with retro images or quotes
Motifs can be your own photos, animal motifs, watercolors, vintage images, graphic patterns, or short quotes – anything that can be printed or cut from paper can, in principle, be turned into image jewelry.
How does the technique work – and why is it so rewarding?
Technically, image jewelry consists of three parts: image + glass/resin + jewelry base. The image is attached to the glass or resin cabochon with a transparent adhesive, which both protects the motif and creates a magnifying, crystal-clear effect. The finished "image stone" is then glued into a jewelry bezel or setting.
The beauty is that you don't need advanced tools to succeed. With a few basic materials, you can create jewelry that feels exclusive, yet is easy to adapt to the recipient and occasion. That's why image jewelry is equally suitable as personal everyday jewelry, memorial jewelry, or thoughtful gifts for someone you care about.
Why choose image jewelry from Hilmaspyssel.se?
When you want to create your own image jewelry, there's a big difference between gathering materials here and there and buying from a specialized store. Hilmaspyssel.se is a Swedish online store that has become a natural choice for many who make their own jewelry at home, precisely because everything you need for image jewelry is gathered in one place – carefully selected for hobby creators of all levels.
Advantages of buying image jewelry materials from Hilmaspyssel.se
-
Wide and well-thought-out assortment: Jewelry bases for necklaces, rings, bracelets, earrings, keychains, bookmarks, and brooches – in several metal colors and styles.
-
Cabochons in many sizes and shapes: Round, oval, heart-shaped, square, and teardrop-shaped glass cabochons that fit directly into the store's own bezels and frames.
-
Ready-made image sheets and motifs: Printed or digital motifs adapted to common cabochon sizes – perfect if you want to avoid the hassle of printing at the correct scale.
-
The right glue, resin, and tools: Selected products that work well specifically for image jewelry, so you don't have to guess between different types of glue.
In addition to the products, there's a clear focus on beginner-friendliness: ready-made kits, clear product descriptions, and materials that are easy to combine. This saves both time and money compared to experimenting with materials that don't quite fit together.
Secure e-commerce and support for crafters
Another reason to choose image jewelry from Hilmaspyssel.se is the security. You're shopping from a Swedish webshop with fast delivery, clear terms, and personal customer service that understands the crafting world. This makes it easy to replenish the same glass, the same jewelry bases, and the same glue when you find favorites – especially important if you want to make series or sell your jewelry. The combination of quality, a wide assortment, and a reliable supplier makes Hilmaspyssel.se a stable base for both hobbies and small-scale sales.
Material Guide – Everything You Need to Create Your Own Image Jewelry
To succeed with your first image jewelry pieces, it's sufficient to have the right basic materials and understand how the parts interact. Here, we'll go through everything you need – from jewelry bases to glue – with practical examples directly linked to the assortment at Hilmaspyssel.se.
Basic materials: jewelry bases, cabochons, and motifs
-
Jewelry bases: Choose from necklace pendants, charms, ring blanks, earring findings, and bracelet links. Example: a round antique bronze bezel 25 mm is perfect for beginners and is available in several designs at Hilmaspyssel.se.
- Cabochons:
- Glass provides a clear, magnifying effect – ideal for detailed motifs.
-
Resin is lighter and more shock-resistant – good for children's and keychain jewelry.
- Motifs and images:
- Your own photos (print on good photo paper)
- Scrapbooking paper and pattern sheets
- Ready-made image sheets for image jewelry from Hilmaspyssel.se, already adapted to common sizes
Think "set" from the start: for example, choose heart-shaped cabochons and matching heart bases for a unified look in necklaces and earrings.
Glue, resin, and smart basic equipment
- Glue and resin:
- Special glue for glass (e.g., Diamond Glaze type) for classic image jewelry.
- Epoxy glue for extra durability, especially for keychains.
-
UV resin if you want to cast directly into the bezel and get a crystal-clear, hard surface without glass.
- Other accessories:
- Jewelry pliers (round-nose and flat-nose)
- Chains in various thicknesses, jump rings, and clasps
- Cotton cord, faux leather, or organza ribbon for quick necklaces
As a beginner, you can avoid buying everything separately by choosing an image jewelry starter kit from Hilmaspyssel.se, which includes bases, cabochons, and sometimes even motifs. Then add good scissors, a reliable glue, and a simple plier set – that's enough to complete many beautiful projects without a large investment. Over time, you can expand your collection with more shapes, colors, and more advanced resin products.
Choose the Right Motif – How to Make Your Image Jewelry Personal and Unique
The motif is the heart of every piece of image jewelry. This is where you can truly personalize your jewelry, whether you use ready-made image sheets from Hilmaspyssel.se or your own photos. For your image jewelry to feel well-thought-out and last over time, you need both the right theme and the right technical quality for the image.
Choose a theme that suits both the person and the occasion
When planning the motif, consider who the jewelry is for and when it will be worn:
-
Personal photos: Family portraits, children, pets, wedding photos, or a special place that means a lot.
-
Interests and hobbies: Music notes, soccer, mountain motifs, flowers, fantasy illustrations, or gaming symbols.
-
Text and quotes: Shorter quotes, names, initials, important dates, or coordinates to a place.
-
Ready-made motif sheets: Hilmaspyssel.se has image sheets with vintage, nature, children's motifs, etc., perfectly adapted to cabochon sizes.
It's a good idea to think "collection" from the start – for example, make a necklace, matching earrings, and a keychain with the same style. This creates a more professional impression, especially if you want to sell your image jewelry later.
Technique: resolution, size, and color matching
For a beautiful result, a pretty motif isn't enough – it also needs to be technically prepared correctly:
-
Resolution and sharpness: Use high-resolution images (preferably 300 dpi for printing). Avoid blurry cell phone photos that are heavily zoomed in.
-
Correct size: Adapt the motif to the shape of the cabochon (round, oval, heart, square). It's a good idea to use templates or test prints before cutting the final paper.
-
Paper type: Choose a slightly thicker, matte or semi-gloss paper for sharper results and less risk of the ink "bleeding" from the glue.
-
Color choice: Match the motif's colors with the jewelry base's metal – e.g., warm, muted colors for antique bronze, bright cool tones for silver, classic and luxurious for gold.
Example:
- A heart-shaped necklace for Mother's Day with a photo of the children in warm tones and an antique bronze base from Hilmaspyssel.se.
- A graduation keychain with name, year, and a small symbol for the education, printed in the school's colors and mounted in a silver-colored base.
- A memorial piece of jewelry with a small, black-and-white photo and date – discreet and timeless in a simple, round bezel.
By spending a little extra time on motif selection, image quality, and color matching, you'll get image jewelry that feels both professional and deeply personal. The next step is to combine your chosen motif with the right materials – something you can easily find in the wide assortment at Hilmaspyssel.se.
Step-by-Step – How to Make Your First Image Jewelry (Beginner-Friendly Guide)
Making your own image jewelry is much simpler than it looks, especially if you follow a clear step-by-step guide. Here, we'll go through the entire process – from the first snip of the scissors to a finished necklace or keychain – with practical tips often missing from shorter guides online.
Preparations: set the right conditions from the start
-
Choose a jewelry base: Decide if you want to make a necklace, earrings, ring, or keychain. For the first time, a round necklace bezel in 25 mm is perfect – easy to work with and forgiving if you cut a little crooked.
-
Choose a cabochon: Clear glass provides a classic, clear motif. Resin cabochons are lighter and often withstand more wear and tear – good for keychains.
-
Choose a motif: Use your own photos or ready-made image sheets from Hilmaspyssel.se. It's a good idea to print the motifs slightly larger than the cabochon, so you can fine-tune the crop.
-
Prepare your workspace: Cover your table with baking paper or a plastic mat. Have cotton swabs, paper towels, and a needle/toothpick ready to remove any bubbles.
When everything is laid out, you reduce the risk of stress – and thus common mistakes like crooked motifs and messy glue.
The assembly itself – step by step to a beautiful result
-
Clean the glass and jewelry base with a lint-free cloth. Grease and dust are the most common hidden culprits behind bubbles and poor adhesion.
-
Test the crop by placing the cabochon over the motif before cutting. Lightly mark around the back with a pencil.
-
Cut the motif carefully along the mark. Slightly too large is better than too small – you can trim it afterwards.
-
Apply glue thinly and evenly to the back of the cabochon (or directly to the motif if the glue manufacturer recommends it). A thin, covering layer is ideal – too thick causes bubbles.
-
Press the cabochon against the motif from the center outwards. Use light pressure and circular motions. Squeeze out any bubbles with your finger or a plastic scraper.
-
Let dry according to the glue instructions, preferably a little longer than the minimum recommendation. Place the glass face down on a flat surface so the motif doesn't slide.
-
Trim edges if paper sticks out. Use sharp scissors or a craft knife and cut along the glass.
-
Glue into the jewelry base with a strong jewelry adhesive. Focus on the edges so the glue doesn't squeeze up over the motif.
-
Attach chain or finding when everything is completely dry. Use a simple ball chain or waxed cotton cord as a first choice.
Concrete beginner projects and extra tips
It's a good idea to start with:
-
A round necklace: A 25 mm antique silver bezel, glass cabochon, and a ready-made motif sheet from Hilmaspyssel.se. This requires few steps and quickly yields a professional result.
-
Matching earrings: Use smaller oval or round bezels with the same motif for a small collection.
Two extra pro tips often missing from simpler guides:
- Let printed motifs dry for at least a couple of hours (preferably overnight) before gluing, especially with inkjet printers.
- Always test the glue on a small scrap of the same paper first, to ensure the ink doesn't bleed.
If you follow this guide step by step, you'll have a finished, durable piece of image jewelry on your first try – and a solid foundation for more advanced projects with materials from Hilmaspyssel.se in the future.
Common Mistakes and How to Avoid Them (Pro Tips for Prettier Image Jewelry)
When you start making your own image jewelry, it's completely normal to encounter problems like bubbles, blurry motifs, or glass that comes loose. Most top-ranked guides mention the errors – but rarely go into depth about why they occur and how to systematically avoid them. Here, you'll get a more detailed overview so your jewelry looks both professional and durable from the start.
Bubbles, blurry motifs, and crooked placement
-
Bubbles under the glass: Often occur when you use too much glue or work too quickly. Spread the glue thinly with a toothpick and slowly press the cabochon against the motif from one side to "roll out" the air.
-
Blurry, bleeding motifs: Common when printing on the wrong paper or using ink that reacts with the glue. Use photo paper or thicker matte paper, let the print dry for at least 24 hours, and always test a small scrap piece first.
-
Crooked images in the jewelry base: Place the cabochon against the motif without glue first, lightly mark the back with a pencil line, and use that as a guide when gluing.
An extra trick is to always work in good lighting and have a damp microfiber cloth nearby to quickly wipe away excess glue before it dries on the glass.
When the jewelry doesn't last – glue, drying time, and durability
-
Glass or resin coming loose: Almost always due to surfaces not being completely clean. Wipe both the cabochon and the jewelry bezel with isopropyl alcohol or dish soap and warm water before assembly, and let everything dry completely.
-
Cracked or cloudy topcoat: Can result from too thick a layer of glue or an incorrect drying environment. Let the jewelry dry flat, dust-free, and at room temperature – not on a radiator or in direct sunlight.
-
Scratches and marks on the glass: Always place baking paper or a soft mat on your workspace so the cabochons don't slide around on hard surfaces.
It's a good idea to create your own small checklist at your crafting table: clean surfaces, correct paper, thin bead of glue, calm assembly, proper drying time. Follow it every time, and you'll minimize beginner mistakes and get image jewelry that lasts and looks just as beautiful year after year. Hilmaspyssel.se also offers quality glues and cabochons that make it easier to succeed right from your first project.
Section 7: Inspiration, Gift Ideas, and Selling Your Own Image Jewelry
Once you've learned the technique behind image jewelry, a whole new world of creative possibilities opens up. In this section, you'll get concrete ideas on how you can use your jewelry as personalized gifts, themed collections – and even as a small extra source of income, with materials sourced from Hilmaspyssel.se.
Creative ideas for various occasions
Here are inspiring uses often highlighted in top-ranked guides – supplemented with more concrete examples:
-
Personal Christmas gifts: Create necklaces with family photos, bracelets with Christmas quotes, or keychains with winter motifs from ready-made image sheets.
-
Baptisms and weddings: Make elegant image jewelry with dates, initials, or monograms for bridesmaids, flower girls, and godparents.
-
Birthdays and holidays: Design jewelry with zodiac signs, favorite quotes, or small "inside jokes" that only the recipient understands.
-
Memorial jewelry: Discreet pendants with a photo and date, or a small motif symbolizing a beloved person or place.
A practical tip is to create several pieces of jewelry on the same theme simultaneously. For example, use a nature-inspired image sheet from Hilmaspyssel.se and create an entire mini-collection of necklaces, earrings, and bookmarks that feel well-thought-out and matching.
Themed collections and selling image jewelry
If you want to start selling your image jewelry, a clear theme is worth its weight in gold – both for recognition and marketing:
-
Nature theme: Flowers, leaves, butterflies, and animal motifs – perfect for markets in spring and summer.
-
Vintage/retro: Old maps, postcards, lace patterns, and black-and-white photos create a popular "shabby chic" look.
-
Children's motifs: Unicorns, superheroes, fairy tale motifs, and colorful icons – popular for party favors and Christmas gifts.
For a smooth start:
- Start selling small-scale at flea markets, local markets, Instagram, or Facebook groups.
- Photograph your jewelry in natural light against a simple background, preferably on a hand, neck, or book to show size and feel.
- Use Hilmaspyssel.se as a recurring source of materials so you can offer the same models again when something becomes a bestseller.
By combining well-thought-out motifs, good product photos, and stable material construction, your photo jewelry can become both appreciated gifts and a small, profitable hobby business.
Frequently asked questions about photo jewelry
Q: What is the best glue for photo jewelry so that the motifs do not become blurry or yellow?
A: For photo jewelry, transparent, non-yellowing glue is crucial. Many hobbyists use special glues developed for glass and paper projects, or two-component epoxy glue/UV resin for extra durability. Avoid hot glue guns and cheap universal glue – they can create bubbles, discolor the paper, or detach over time. Always test the glue on a print sample before making a complete piece of jewelry, especially if you print the motifs yourself.
Q: Can I use regular prints from my printer for photo jewelry?
A: Yes, but with some important considerations. Print in high resolution on slightly thicker, smooth paper. Let the print dry for at least a few hours (preferably overnight) so the ink has time to cure. Inkjet printers can react with certain glue types and start to bleed – therefore, many choose laser printers or ready-made image sheets from stores like Hilmaspyssel.se, where the paper and print are already adapted for photo jewelry.
Q: How do I make photo jewelry more durable for daily wear or sale?
A: Invest in quality components and careful workmanship. Some key points:
-
Sturdy metal jewelry bases that won't lose color quickly
-
Correct amount of glue and thorough cleaning of glass and base before assembly
-
Sufficient drying time, preferably longer than the minimum time on the package
- For extra protection: cover the back of the paper with a thin layer of varnish or resin
This makes a big difference if you want to sell your photo jewelry or give them as keepsake jewelry that will last for many years.
Q: What is the difference between glass and resin cabochons in photo jewelry?
A: Glass often provides the clearest luster and weight, perfect for classic necklaces and jewelry with a "glassy" feel. Resin is lighter, more impact-resistant, and suitable for larger motifs, children's accessories, or earrings where weight matters. Resin can also be cast directly over the motif in an open bezel, offering more creative possibilities. Both work well – choose according to style, feel, and how the jewelry will be used.
Q: How can I get started quickly if I've never made photo jewelry before?
A: An easy way in is to start with a photo jewelry starter kit where you get jewelry bases, glass, and sometimes motifs all together. Choose a round pendant (easiest to fit motifs into), print or cut out a favorite photo, follow a step-by-step guide, and first make a single necklace or a keychain. Once you see how smooth it is, you can build on with more shapes, collections, and materials from Hilmaspyssel.se.
Your own photo jewelry – from idea to finished piece
You have now completed the entire journey – from what photo jewelry is, why it is so popular, what materials work best, how to choose personal motifs, to a clear step-by-step guide and professional tips to avoid common mistakes. Together with inspiration for gifts and sales, you have a complete toolbox to confidently create unique, durable, and heartfelt jewelry that truly means something – both for you and for the person who gets to wear them.
Now it's your turn to put everything into practice. Start simple: choose a jewelry base, a motif that resonates with you, and follow the guide to make your first necklace or a personalized keychain. Explore the assortment of photo jewelry materials, starter kits, and ready-made image sheets at Hilmaspyssel.se, save this article as your fixed reference, and dare to experiment with new motifs and collections. Take the first step today – and discover how fun and easy it is to make your own photo jewelry with the right materials and guidance.